Home Contact Cart

Saturday, December 19, 2009

Busy Couple of Weeks


Thank you to everyone that entrusted me with creating your Christmas gifts this year! Its been a busy couple of weeks. I just completed my last big order of the season Friday morning and mailed it out Priority Mail. Luckily it is only going about 15 miles. Here's a picture of the gifts, 1 Mother's Photo Bracelet featuring Swarovski(r) Austrian Crystals and Silver Plated Pewter Charms and Sterling Silver components and 6 Photo Key Rings featuring Swarovski(r) Austrian Birthstone Crystals. I just love making these gifts! I've been so busy, that I haven't had time to add the birthstone charms to my website, www.photodesigngifts.com. If you are interested in ordering one, the pewter keyrings with birthstone charms are only $14.95.


Monday, November 30, 2009

Cyber Monday Sale


Yay! Its Cyber Monday! Frantically looking for the perfect gift for Christmas for that hard to shop for person? My already affordable prices are discounted an additional 20% off when you use the discount code: CM2009. Hurry, this sale ends tonight and Christmas is just around the corner! To guarantee Christmas delivery you would need to order by December 2nd. This allows me enough time to complete your custom order and the post office to delivery to you.

If you are purchasing my Christmas Earrings only than they will ship the next day (Mon-Fri).

Remember, shipping is still FREE for USPS 1st Class Mail. If you would like to upgrade to USPS Priority Mail, just let me know and I can send you an invoice for the additional shipping cost.


Saturday, November 21, 2009

Whimsical Mother's Photo Pendant Necklace


Our popular Whimsical Mother's Photo Bracelets now come as a necklace!

This necklace includes 1-2 photos of your family on silver plated pewter charm(s), Swarovski Austrian Crystal Birthstones wire wrapped onto the sterling silver chain necklace. With this necklace you can show off your family with style. Makes a great gift for your Mother or Grandmother..

This necklace is just a representative of what yours could be... Photo shows the 2 photo choice. Bracelet takes approximately 7-10 days to ship after I receive all the photos. Photos can be submitted online or mailed to me.

The sterling silver chain is approximately 26" long, but can be adjusted to whatever length you prefer, with a matching birthstone dangle hanging down.

Order yours here:
Whimsical Mother's Photo Pendant Necklace

Retail Price:
1 picture charm + 6 Swarovski Crystals = $44.95
2 picture charms + 8 Swarovski Crystals = $49.95

Price includes shipping & handling.

To guarantee delivery before Christmas, please order before December 1st. Thank you.

Sunday, November 8, 2009


Wow! Its almost time for Christmas!! Okay, so at least I waited until after Halloween to announce this. LOL For specialty web boutiques like mine, now really is the time to be ordering your custom made jewelry pieces to guarantee that you have them in time for Christmas.

I am only able to guaranteed Christmas delivery if your custom photo jewelry is ordered before December 1st. This guarantees that I have enough time to create your one of a kind jewelry and mail it out to you in plenty of time. I personally like to have all orders completed in in the mail by December 10th, so that both my clients and I are not biting our nails hoping the package gets there in time.

Okay, on a happier note, aren't these Christmas Light earrings and bracelets the cutest? I like them so much that I will be wearing them starting Black Friday! These both are available to purchase on my website, www.photodesigngifts.com.


Blog Hop #1 Winner

I was sick for most of October and now all of November. LOL I'm finally starting to feel like I have a life again TODAY! So, it is only today that I'm writing to let you know that Erica won my Blog Hop contest. You can visit Erica's blog at: http://melturscentz.blogspot.com/.

Congrats Erica and I hope you are enjoying your bracelet as much as I would have. :D


Wednesday, October 14, 2009


I had fun this past week end learning to make PMC (Precious Metal Clay) jewelry. Once "fired" the PMC ends up being 99.9% Fine Silver. Here are a few pictures of what I made. I had the most trouble with the butterfly pendant. But I really love how the daisy pendant came out and I'm already wearing mine and Leighton's thumbprints. Look how much bigger his thumbprint is than mine! The Swarovski Austrian Crystals are made with our birthstones, Crystal and Alexandrite (aka Light Amethyst). The chain and other findings are sterling silver. I can't wait to start offering Fingerprint / Pawprint jewelry in my store. Coming soon....

Don't forget that I have a giveaway going on with MySEOGal's 1st Blog Hop. Clock on THIS post for more info.


Wednesday, October 7, 2009


My SEO Gal's 1st Blog Hop has been underway for a few days. I thought that I better get a picture up of the actual prize that I'm giving away for the blog hop. Its a Whimsical Charm Bracelet that features 22 Swarovski Austrian Crystals, 5 Furnace Beads and Sterling Silver findings. The bracelet is 7-3/4 inches long. Retail Value = $49.95. This bracelet is so fun and unusual that I want to keep it for myself! However, instead one lucky winner will be receiving it. See my post below from Oct 4th to participate. Make sure you add any comments to the post from October 4th to qualify.


Sunday, October 4, 2009

My SEO Gal’s 1st Blog Hop!


My SEO Gal’s 1st Blog Hop!

To help me become a better blogger I have joined My SEO Gals 1st Blog Hop! The blog hop runs from Oct 5th – 21st at 12:00AM Central Time. During this time make sure and visit other blogs listed on the MckLinky below. These other blogs consists of some great businesses and some of them include giveaways. Spend a little time each day for the next two weeks and you will discover some great online boutiques and maybe even win a prize or two!

As a special giveaway to kick start this new blog hop I’m giving away a special gift. It will be a Whimsical Charm Bracelet similar to the one pictured here. I’m having a couple of computer issues this week and will try to have a picture up with the actual prize by the end of the week.


The Rules of the Contest

  • The winner will be chosen by random.org.
  • All comments must be left between now and October 21st at 12:00am CT.
  • Every entry will require a separate comment here, since that is how the random generator will work.
  • You must leave a way for me to contact you in at least one of the comments that you leave on here. If you prefer, you may email me your contact info here: laura at photodesigngifts.com (no spaces).
  • I will contact the winner within 72 hours and if I do not here back from the winner after 72 hours, then I will chose a new winner through random.org.

Ways to Enter Photo Design Gifts Giveaway

  1. Required to Enter: Visit www.photodesigngifts.com and then come back here and write a comment about what your favorite item is.
  2. Follow this blog, Whimsical Charms and leave a separate comment here.
  3. Fan Photo Design Gifts on Facebook and leave a separate comment here.
  4. Post about our giveaway on your Facebook Wall and come back here and leave a separate comment letting us know.
  5. Complete all four of the above ways to enter and leave a separate comment here to receive a bonus entry!
  6. During the next two weeks I may add to this list, so remember to come back and check for more chances to enter!
  7. Remember to have fun!!


MckLinky Blog Hop


Saturday, October 3, 2009

Whimsical Mother's Photo Bracelet


Recently I needed to make one of my closest friends a gift to help welcome her new baby, "5". Since this was her 2nd baby she didn't want a baby shower or gifts, but I couldn't not give her anything. So, since I'm in the process of trying to make samples for my new jewelry collection, Whimsical Charms I decided to make her a non-traditional sterling silver Mother's bracelet for her to showcase her family. I took these pictures quickly before giving her the bracelet, so I think I'll have to sneak over to her house sometime soon and take some better pictures.

The bracelet has 4 pewter picture charms to showcase her family (one each of the kids solo, one of them together and one of the parents together). The Swarovski Austrian Crystals represent the family's birthstones. I then handstamped on sterling silver the family's name.

Carmen loved the bracelet so much that she ended up ordering 3 matching keyrings (one for each Grandmother and one of herself). I hope you enjoy the bracelet as much as she did.

This design is coming soon to www.photodesigngifts.com

Wednesday, September 30, 2009


Welcome to Whimsical Charms' new blog. This blog is being started to help me to showcase some of my custom work that I am doing. I am importing my previous posts from my other blog that I rarely wrote it, but will hopefully be better about. :-)

Here are a couple of pictures of a Whimsical Charm bracelet that I created for myself to showcase this new fun design!

Saturday, June 20, 2009

Check Out My Retired Stampin' Up!(r) Sets on eBay


I'm going to convention for the first time this year! Woohoo! To help raise money for my expenses I'm selling some of my retired stamp sets. Some of them I have a slight emotional attachment to and they will be missed. You can see all my stamp sets available here:

Stampin' Up! Retired Sets


Pictured is just a sample of some of the sets available that I listed today. I'll be listing some more sets later this week end as well.

Images (c) Stampin' Up!

Sunday, May 10, 2009


Opps! I forgot to show you the cute gift box that I made to give the pendant in! I realized at the last minute that I didn't have a gift box ready to go. I thought about just putting it in a organza bag and giving it to her that way, but considering my sister, Mama Kat is also my leader... what would be the fun in that? So, I quickly made her this cute box using the Big Shot Die-Cut Machine (page 193 in the catalog) and the Box #2 die (page 194). I used the Parisian Breeze Specialty Paper (page 158). For the embellishment, I cut a Stampin' Up Simple Flower die cut (p. 202) out of Baja Breeze cardstock and attached it with a Chocolate Chip Corduroy Button (p. 176). To finish the look I tied a Chocolate Chip ribbon (p. 179) around the box. It took me less than 5 minutes to make the perfect gift box! Best part, everything was color coordinated! Because Stampin' Up! is kind enough to tell us what colors are showcased in the Designer Series Paper, I knew what cardstock and color of button to use!

Images (c) Stampin' Up!

It's About Time!!


It's about time I did another post on my blog! I've been neglecting it once again these past few months. That is because I've been working on a new product line for my website, www.photodesigngifts.com. I'm still not 100% comfortable putting my new jewelry line up for sale yet, but should have it all ready to go in the next few days. I will show you a sneak peak here. This is a pendant that I made for my sister for her birthday. Everything is made with sterling silver and handstamped by me! I just can't get away from stampin'!! LOL For the final touch I added a Swarovski Austrian Crystal.

It's about time I did my first workshop for Stampin' Up! After being a independent demonstrator with Stampin' Up! for almost 14 months, I held one! Woohoo!! It was a learning experience. I have a lot more respect for my leaders now. Its not as easy as they make it look. LOL Here are pictures of the three projects that I did for my workshop.

Here are two of the three projects that I did for my workshop. I need to remember to take a picture of the 3rd project! It was sooo cute, but for now you will just have to trust me. :-)

Some Images (c) Stampin' Up!


Friday, February 20, 2009

Pop-Top Can Surprise

Here's one of my favorite gift holders. My sister, Kat of Mama Kat's Playground
taught me how to do this.

Supplies Needed:

Pop-top can with a hard edge bottom (not round; I used a Chunky Soup can)
8 ½” x 11” Card stock or patterned paper cut to fit (for Chunky I used 4 3/4 “ x 11”)
Card stock to use for whatever stamping or designs you want on the can to decorate
Terrifically Tacky Tape®
Glue Dots or Dimensional Dots
Pampered Chef® can opener
Krazy Glue® Brush On
VersaMark® pad (or light colored ink pad)
Glue stick
Favorite stamp set
Favorite ink pads
Small cello bag
Rub-On’s (optional)
Two pieces of ribbon
Shredded Paper


Some Images © Stampin’ Up!


Step 1:
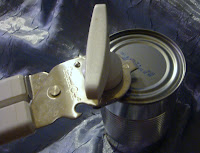
Open can with with the Pampered Chef® can opener from the bottom. Carefully pry off the bottom and enjoy the soup or put in a different container for later. Thoughroughly wash the can. I recommend letting it sit with some soapy water to help get rid of the food smell.


Step 2:

(Before starting this step, see Step 5 in case you want to stamp the cardstock going onto the can. Do this first)
Put three long pieces of Terrifically Tacky Tape on the paper. I HIGHLY recommend getting this tape specifically since it is the strongest tape I ever used. You can find it through DS companies like Stampin’ Up!, Michael’s or other retailers (including online) that sell scrapbooking supplies. Take off one piece of the red plastic at a time to make sure you attach the paper properly to the can. What I do is that off the first strip, carefully place it on the can and then before I take off the other strips I roll the can around the cardstock to shape the paper around the can. Then I go back and take of the second red strip and smooth the cardstock around the can and attach it. Repeat to completely attach the cardstock.


Step 3:

Take the VersaMark® pad and tap it onto the inside part of the bottom lid. Press it onto left over matching cardstock two times (Save one piece for the top; Step 4). Then cut around the outer ring and it will fit the bottom lid perfectly. Adhere with Terrifically Tacky Tape. Set aside bottom for later.


Step 4:

Tap the VersaMark® pad onto of the pop-top “thingy” and then take the 2nd cardstock piece from Step 3 that has the VersaMark® on it and press down on the top part. Cut out out of the pop-top pattern (see examples for how much). To adhere the top piece I didn’t use the Terrifically Tacky Tape®, instead I used a glue stick. I did this because I wanted to make sure that I had time to put the cardstock in place. If I had use the Terrifically Tacky Tape® I might not have had time since the tape is really sticky.


Step 5:

Take your favorite stamp set and stamp whatever you want to put on the can. If you want you can stamp the card stock you are going to be putting around the can. For this particular can I decided to do a funky design with Stampin’ Up!’s Delight in Life stamp set. I first stamped in black the outline all over my 8 ½” x 11” cardstock. I then went back and stamped the inside of the flowers with different colors of ink. To give my flowers a little different texture I put Stampin’ Up!’s Crystal Effects on to off them. I then set the card stock aside to dry (I let it dry overnight). More on the flowers I did in Step 8. If you are going to use Crystal Effects then I recommend you start here for Step 1.


Step 6:

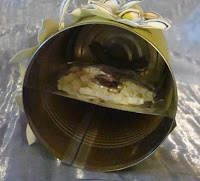
Here’s an example of what you could put in as a surprise gift. For this example I added a keychain that I made. I’ve done in the past bath & body samples and gift cards. Whatever I give I try I put it in a cello bag. For this project I decided to put a couple of rub-on’s on the cello bag to make it extra cute. I put some shredded paper into the cello bag with the gift and then added a ribbon. Make sure and add the gift into the can so that the top part of the gift faces towards the pop-top. I then add a little bit more shredded paper on top of the cello bag. This will actually be the bottom of the can once sealed.


Step 7:

Take the bottom lid and use Krazy Glue® Brush-On to adhere the lid to the bottom of the can. The Brush-On gives you those extra seconds needed to secure the lid properly to the bottom. Hold the lid in place for a few seconds and it should be sealed tightly. It won’t look like the can was ever opened.


Step 8:

If you are making the flowers the same way as I did, I think they look cute if you pinch them a little bit to give them some extra dimentions. I used glue dots to place them all around the can and on the top as well.


Step 9:

You are finished! Here is a picture of the top of the can and another can that I did using designer baby and stickers from a Stampin’ Up! Scrappin’ Kit.